Automate Flutter Deployments to App Store and Play Store using Fastlane and Github Actions for a lazy developer
I find streamlining the release of Flutter apps to App Store / Play Store / testers to be a pain. There are so many moving parts and so much configuration. And the documentation is not always the best. Even though I have done it a few times - and can copy from older projects - I still find myself googling the same things over and over again.
I find that despite there being a lot of tutorials on setting up CI/CD for Flutter apps, most of them are either outdated, too complicated, containg errors or are just not very clear.
I wrote this article to provide a no-nonsense guide to setting up automatic release of your Flutter app using GitHub Actions and locally, using Fastlane, in the simplest and fastest way possible.
This is less of a tutorial and more of a copy-paste guide. Because let's be real, who has time to read through a 10-page tutorial when you just want to get things done.
What you'll end up with
A Flutter app that is automatically built and deployed to the App Store (TestFlight) and Play Store every time you create a new release on GitHub. From there you can manually release the app to the public using the respective platforms.
It also includes:
- A fully functional Fastlane setup for both Android and iOS, managed entirely by configurable environment variables (making it easy to run locally, but also via deploy tools like Github Actions or other CI/CD tools)
- Automatic versioning of the app (based on the release tag)
- Automatically running build_runner if your project uses it
- Support for Firebase Crashlytics if you are using it (or plan to use it), by uploading the dSYMs
- Automatic code signing for iOS using Fastlane Match
- Automatic incrementing build numbers fetched from Google Play Console and App Store Connect
- Optionally using Firebase App Distribution on Android for distributing your app to testers
- Optionally sending Slack notifications when a build is successful or fails (if you provide a webhook URL)
Prerequisites
- You have a Flutter app that you want to deploy
- You have a developer account for the stores you wish to deploy to (App Store and/or Play Store)
- You have installed Fastlane on your machine - seems like many people from the community recommends just installing it via Homebrew (if you're on mac). Alternatively you can handle it via rbenv or rvm. I'll leave it up to you to decide how you want to install it. You can find the installation instructions for Fastlane here
- You have a GitHub repository for your Flutter app, if you wish to use GitHub Actions for automating the deployment
Example Flutter project
I have created a simple Flutter project based on this post. You can find it here: constantsolutions/flutter_fastlane_tutorial.
I have seperated each commit, so you can see exactly what I did to set up the project. You can use this as a reference if you get stuck.
Bootstrapping the project in one command
I have created a simple Dart script that you can use to bootstrap your Flutter project with the necessary Fastlane files. If you have any existing fastlane configurations, you can delete them as this script will create new ones, or alternatively inspect the script and modify it to suit your needs.
The script will create the following files:
- android/fastlane/.env
- android/fastlane/Appfile
- android/fastlane/Fastfile
- android/fastlane/Pluginfile
- android/key.properties
- ios/fastlane/.env
- ios/fastlane/Appfile
- ios/fastlane/Fastfile
- ios/fastlane/Matchfile
- ios/fastlane/Pluginfile
- google_service_account.json
The script will also:
- Modify android/app/build.gradle (to include the signing configuration)
- Read ios/Runner.xcodeproj/project.pbxproj (to include the correct bundle identifier in ios/fastlane/.env)
- Read android/app/build.gradle (to include the correct package name in android/fastlane/.env)
- Ensure that your .gitignore contains sensitive files such as .env and other files for your safety
To run the bootstrap script, run the following command in the root of your Flutter project:
curl -o bootstrap_fastlane.dart https://gist.githubusercontent.com/simplenotezy/f52b470293edafa919584d911cc5e6b9/raw && dart run bootstrap_fastlane.dartIf you're curious, you can inspect the script here.
Fetching the secrets
The next step is to fill out the .env files in the android/fastlane and ios/fastlane directories with the necessary information.
I'll assume you'll be wanting to deploy to both the App Store and Play Store. If you only want to deploy to one of them, you can skip the steps for the other platform.
While you add each secret to the .env files, make sure to also add them to your GitHub repository's secrets as well. You can do this by going to Repository Settings -> Secrets -> New repository secret.
Play Store for Android builds
Go to the Google Play Console and create a new app, if you haven't already.
Service Account JSON
The Fastfile is using supply to upload the application bundle (AAB) to the Play Store. They have an excellent guide on how to set up the necessary permissions and credentials - below is a condensed version.
Here's a short summary:
- Create a new Google Cloud Console project (if you don't have one already).
- Enable the Google Play Android Developer API
- Create a new Service Account for the project, and copy the Email address (e.g.fastlane-deployment@flutter-fastlane-tutorial.iam.gserviceaccount.com). Give it Firebase App Distribution Admin role if you wish to use Firebase App Distribution for distributing your app to testers. Otherwise click "Done".
- Open up the newly created service account by clicking on it in the list. Click "Keys", then "Add key" and choose "JSON". Copy the downloaded JSON key to the fluuter root directory and name it google_service_account.json.
- Add the Serive Account JSON email in the Google Play Console under Users & permissions with the role Admin (all permissions).
Now let's base64 encode the google_service_account.json file, run the following command:
base64 -i google_service_account.json | pbcopyAdd it to the GitHub secrets as FIREBASE_SERVICE_ACCOUNT_BASE64 (this is needed for Github Actions).
Firebase App Distribution (optional)
If you wish to use Firebase App Distribution for distributing your app to testers instead of directly to the Play Store, you'll need to fill in FIREBASE_APP_ID in the android/fastlane/.env file. You'll find the id in the Firebase console under Project settings -> General -> Your apps -> App ID.
Remember to enable it in Firebase here from the left menu under Run -> App Distribution.
Personally I prefer just to use TestFlight and Play Store and skip Firebase App Distribution, I find it to be an unnecessary step - let me know in the comments if you have a different opinion.
Generate a signing key for uploading to Play Store
Generate a signing key for your app. This key is used to sign the android app, which is required for uploading to the Google Play Store.
keytool -genkey -v -keystore ~/key.jks -keyalg RSA -keysize 2048 -validity 10000 -alias release(You might need to install the Java Development Kit (JDK) to use the keytool command, using brew run brew install openjdk)
You can use this snippet, to generate a random secure password for the keystore:
openssl rand -base64 18 | tr -d '='Save the password you entered in the keytol in Github Actions as ANDROID_KEY_STORE_PASSWORD.
Copy it to android/key.jks, and ensure that it is added to your .gitignore file:
cp ~/key.jks android/Now edit the android/key.properties file. Set storePassword and keyPassword to the ANDROID_KEY_STORE_PASSWORD you created in the previous step.
storePassword=<the password you used when generating the key>
keyPassword=<the password you used when generating the key>
keyAlias=release
storeFile=../key.jks
Now let's base64 encode the android/key.jks file and add it to the GitHub secrets as ANDROID_KEYSTORE_FILE_BASE64. Run the following command:
base64 -i android/key.jks | pbcopyIf you're on Windows, ask ChatGPT how to base64 encode a file without line breaks and without losing your sanity.
Modify the build.gradle file
Now modify your android/app/build.gradle. If you used the bootstrap script, it should've done this for you, but if not, you can do it manually - or verify that it's correct.
Above the android block, ensure the following is present:
def keystoreProperties = new Properties()
def keystorePropertiesFile = rootProject.file('key.properties')
if (keystorePropertiesFile.exists()) {
    keystoreProperties.load(new FileInputStream(keystorePropertiesFile))
}
Ensure a signingConfigs block is present and modify the release build type to use the signing config:
    signingConfigs {
        release {
            keyAlias keystoreProperties['keyAlias']
            keyPassword keystoreProperties['keyPassword']
            storeFile keystoreProperties['storeFile'] ? file(keystoreProperties['storeFile']) : null
            storePassword keystoreProperties['storePassword']
        }
    }

    buildTypes {
        release {
            // TODO: Add your own signing config for the release build.
            // Signing with the debug keys for now, so `flutter run --release` works.
            signingConfig = signingConfigs.debug
            signingConfig signingConfigs.release
        }
    }
Testing locally
Hurray! You can test the Play Store deployment locally by running the following command in the android directory:
fastlane release_play_storeManually uploading the first build
If it's a brand new app you're deploying, you'll need to set up your app manually first by uploading at least one build to Google Play Store. See fastlane/fastlane#14686 for more info.
- Go to the Google Play Console, choose your app, and upload the first build manually.
- Go to Testing -> Internal testing -> Create a new release -> Drop app bundles here to upload
- If prompted for signing key, just let Google manage it for you.
- You can use
0.0.0as the release name. - Run a fastlane build (
fastlane buildfrom android directory) to get the app bundle. You can upload the app bundle to the Play Store (/your-flutter-project/build/app/outputs/bundle/release/app-release.aab). - Publish the release
After that, you can use Fastlane to upload the builds automatically.
If you get the error Google Api Error: Invalid request - Only releases with status draft may be created on draft app have a look at this discussion. You can also set the release_status to draft in the supply action in the android/fastlane/Fastfile:
supply(
  track: 'internal',
  release_status: 'draft',
  aab: "../build/app/outputs/bundle/release/app-release.aab",
Summary
You can now automatically publish your Flutter app to the Play Store by running the fastlane release_play_store command in the android directory or by creating a new release on GitHub. Continue reading to set up the App Store deployment, and learn how the GitHub Actions workflow file works.
App Store for iOS builds
We'll be using Match to manage the code signing for iOS. Match is a tool that allows you to share code signing certificates and provisioning profiles across your team (or across your CI/CD pipeline and your local machine).
Step 1: Create/retrieve your App bundle ID
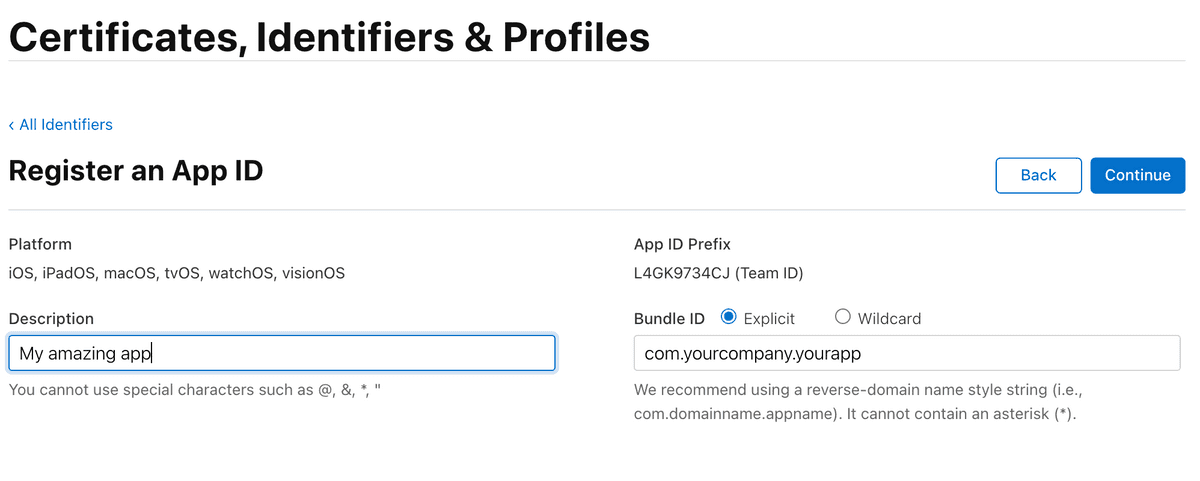
Go to the Apple Developer Console and create a new App ID. You can find the App ID in the Identifiers section (select App IDs -> App when asked what type of identifier you want to create).
Tip: If you used the bootstrap script, check the ios/fastlane/.env to find your APP_BUNDLE_ID
Make sure your App ID is in the format com.yourcompany.yourapp and that it matches the PRODUCT_BUNDLE_IDENTIFIER from your ios/Runner.xcodeproj/project.pbxproj file.
Set the APP_BUNDLE_ID variable in your .env file and Github Actions Secrets to this value.
Step 2: Create a personal GitHub access token
Create a classic personal access token in your GitHub account, this is used by Match (in the next step) to access the repository where the certificates and profiles are stored.
You can do this by going to GitHub -> Settings -> Developer settings -> Personal access tokens.
Select the repo scope, and copy the token. Now convert the token to a base64 string by running the following command in your terminal:
echo -n 'your_github_username:your_personal_access_token' | base64 | pbcopyThe base64 string will be copied to your clipboard. Set the MATCH_GIT_BASIC_AUTHORIZATION variable in your ios/fastlane/.env (and Github Actions Secrets) file to this value.
Step 3: Generate certificates and provisioning profiles
Create a private GitHub repository to store your certificates and provisioning profiles. You can call it app-certificates-and-profiles or something similar.
Once created, add the github repository URL to your ios/fastlane/Matchfile (make sure it ends on .git):
git_url("https://github.com/your/app-certificates-and-profiles.git")
git_url("https://github.com/constantsolutions/app-certificates-and-profiles.git")
storage_mode("git")
type("appstore") # The default type, can be: appstore, adhoc, enterprise or development

app_identifier([ENV["APP_BUNDLE_ID"]])
Then run fastlane match appstore from the ios folder, to generate the certificates and profiles. This will automatically create a new certificate and provisioning profile for your app, and store them in the repository you specified.
Note down the passphrase you used when running the match command. Set the MATCH_PASSWORD variable in your .env file and Github Actions Secrets to this value.
Tip: You can use Fastlane Credentials Manager to store your login information which you'll be prompted for several times during the process. This is only needed when running locally. Run fastlane fastlane-credentials add --username [email protected] to store your login information. You can then run [email protected] fastlane match appstore without being prompted for your login information.
Step 4: Create API keys for App Store Connect
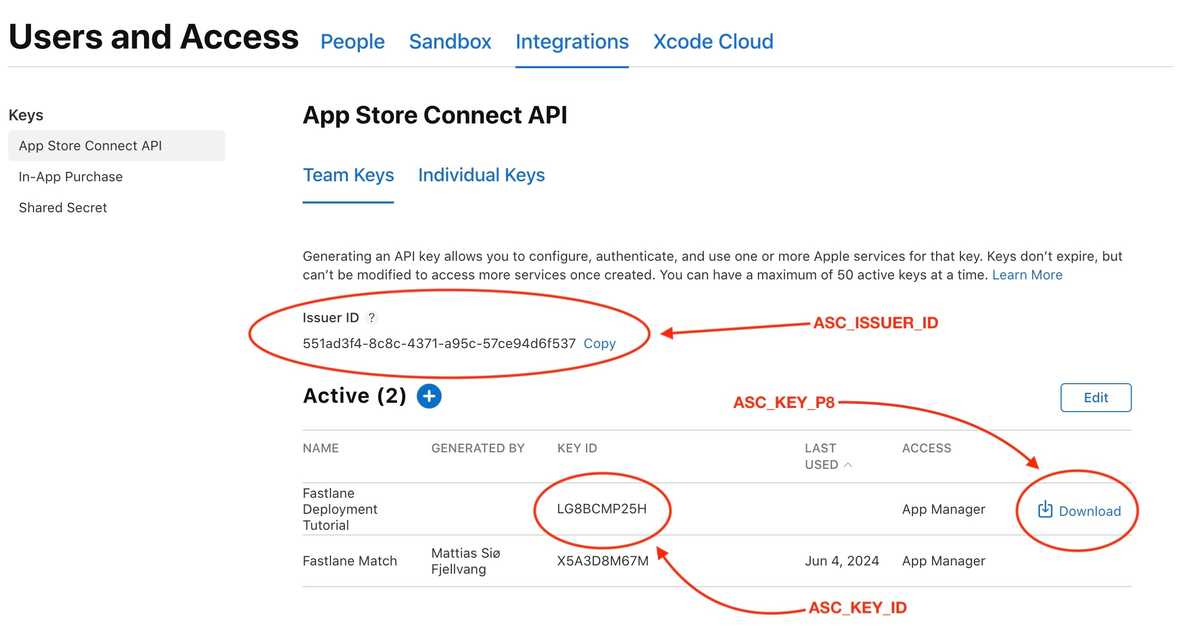
Go to App Store Connect -> Users and Access -> Integrations and create a new Team Key with the App Manager role.
Set the ASC_KEY_ID, ASC_ISSUER_ID variables in your .env file and Github Actions Secret to the values displayed on the key page.
The ASC_KEY_P8_BASE64 value should be the contents of the .p8 file, base64 encoded. Download the key, and run the following command in your terminal, to base64 encode the key and copy it to your clipboard:
cat ~/Downloads/AuthKey_KEY_ID_HERE.p8 | base64 | pbcopyStep 5: Create a new app in App Store (optional)
If you haven't already, create a new app in App Store Connect. You can do this by going to App Store Connect -> My Apps -> (+) New App.
Step 6: Adjust signing for release mode
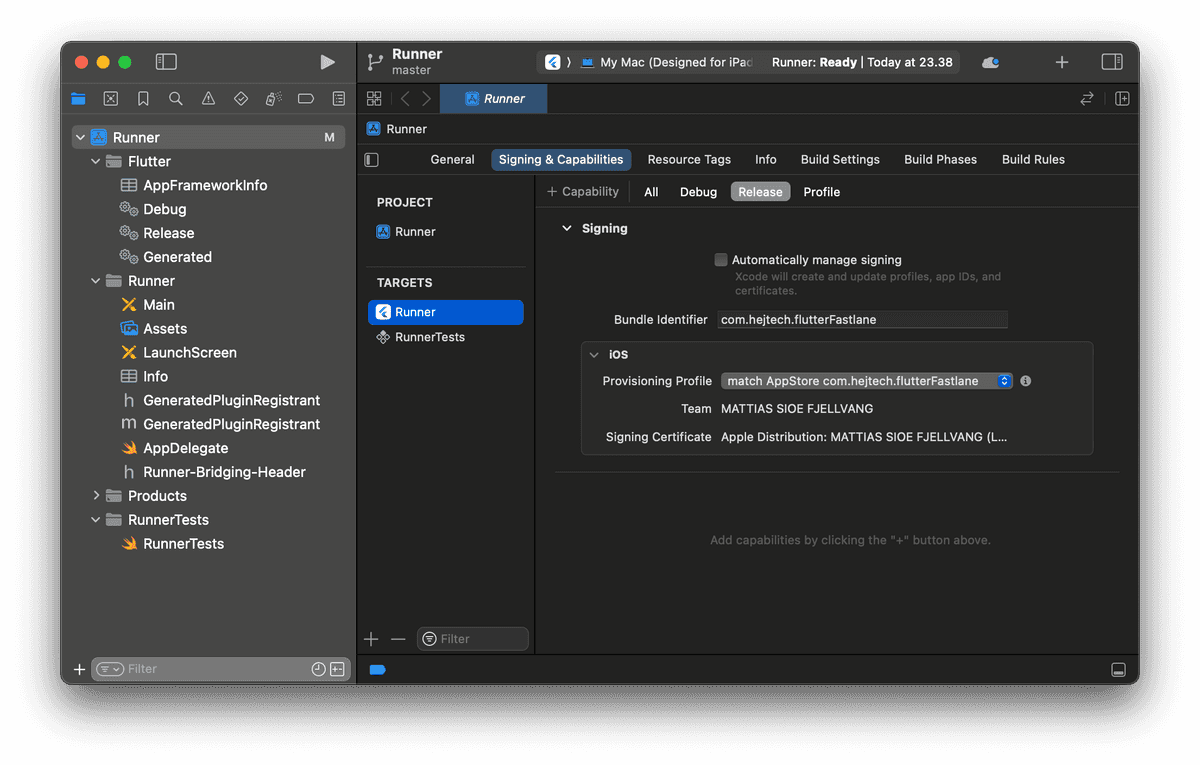
We now need to adjust the code signing settings for the release mode, so Xcode uses the certificates and provisioning profiles we just created with Match.
- Open XCWorkspace in Xcode (
open ios/Runner.xcworkspace) - Select the Runner project in the left sidebar, and select the "Runner" target in the main window.
- Go to the "Signing & Capabilities".
- Go to "Release" and untick "Automatically manage signing".
- From Provisioning Profile you might need to click "Download" to download the profile.
- Select the "match AppStore [your app identifier]" profile.
Step 6: Test the deployment
You can now test the deployment to the App Store by running the following command in the ios directory:
fastlane release_app_storeHopefully, you'll see your app being uploaded to App Store Connect. It will take a few minutes for the build to be processed and before it'll be available for testing.
From here, if you're happy with the result, you can release the app to the public.
Deploying with GitHub Actions
If you used the bootstrap script, you should have the necessary files in your project, otherwise you can create it manually (see "The GitHub Actions workflow file")
The Flutter version used by the GitHub Actions runner is specified in the pubspec.yaml file under the environment section, so make sure to add/modify it.
Create a new release
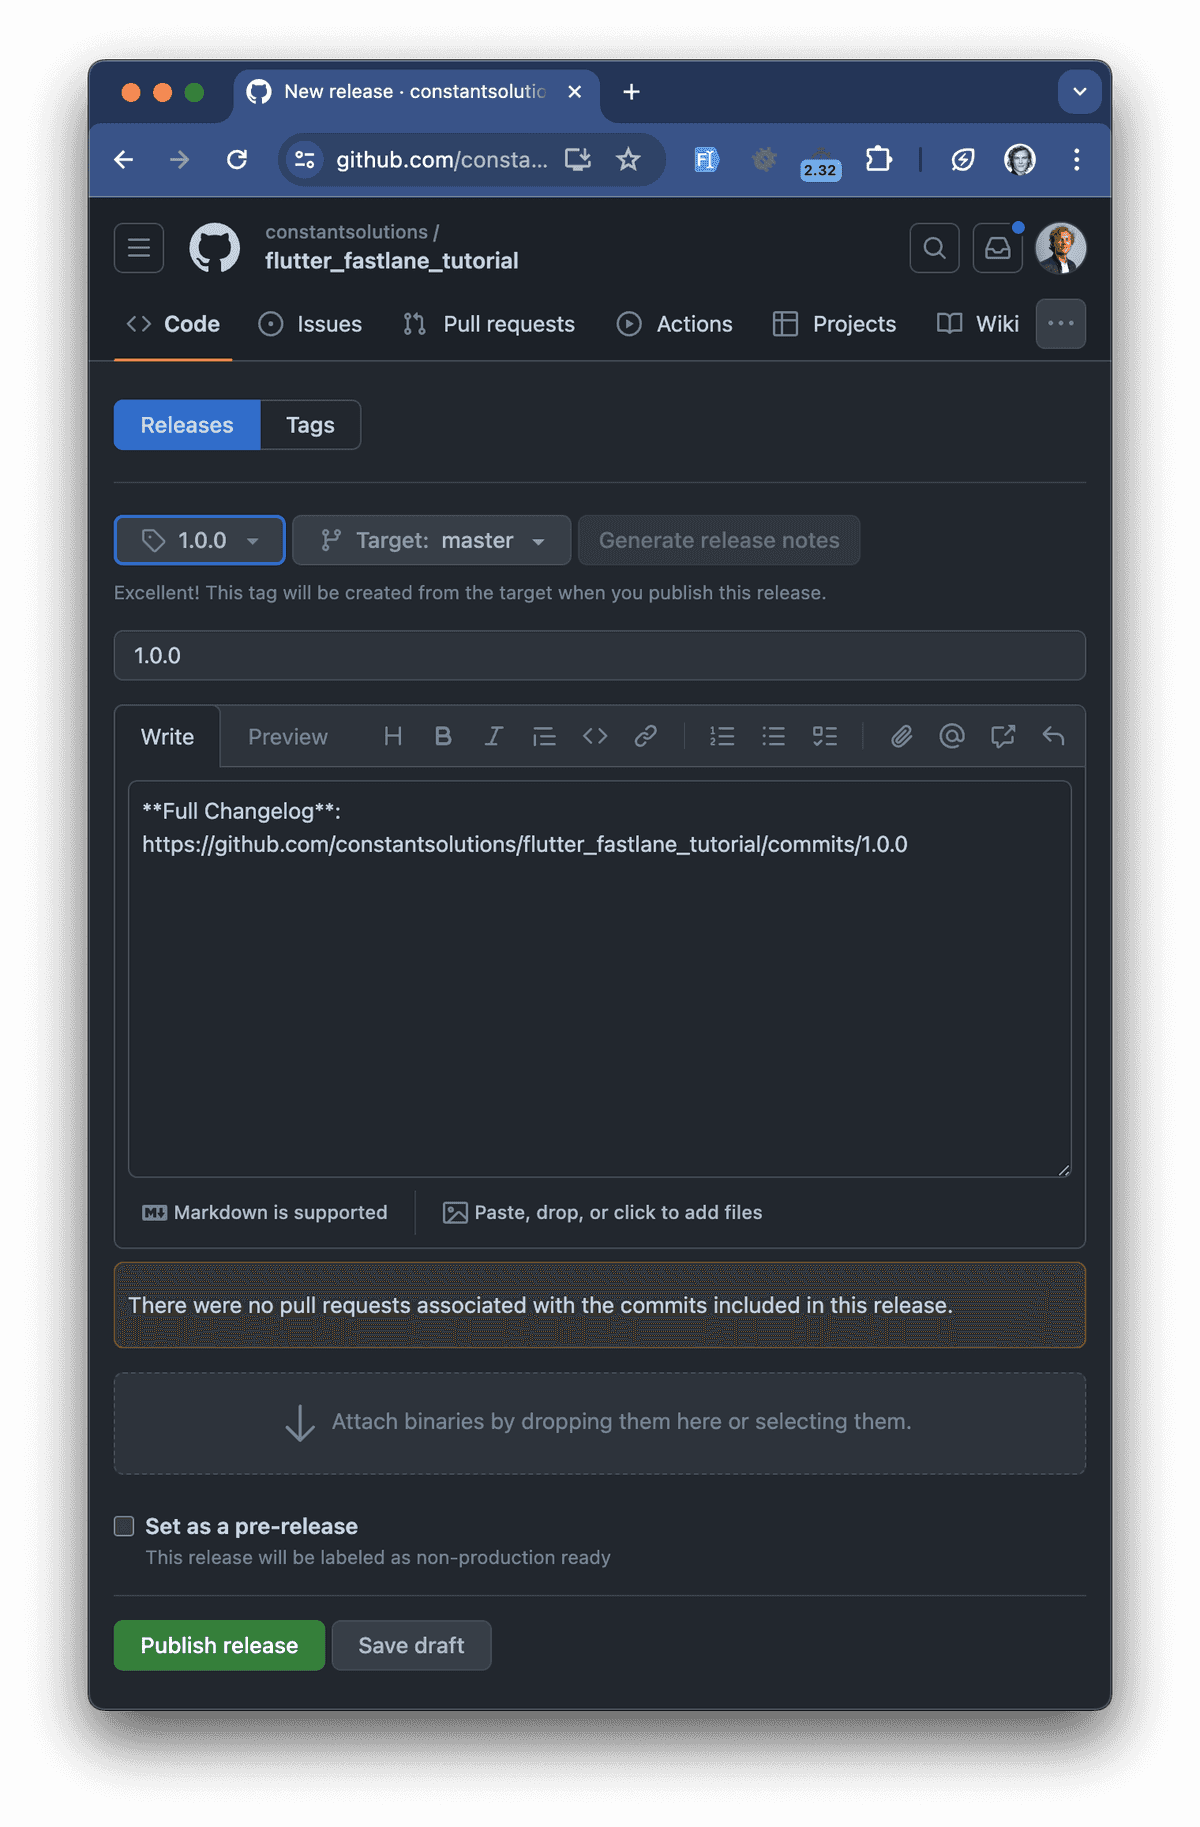
Go to your GitHub repository, and click on the "Releases" tab. Click on "Draft a new release", and fill in the necessary information.
Press "Choose a tag" and give it a version number (e.g. 1.0.0). You can also add a title and description if you wish.
Once you're ready, click "Publish release". You should see the GitHub Actions workflow kick in and start building and deploying your app.
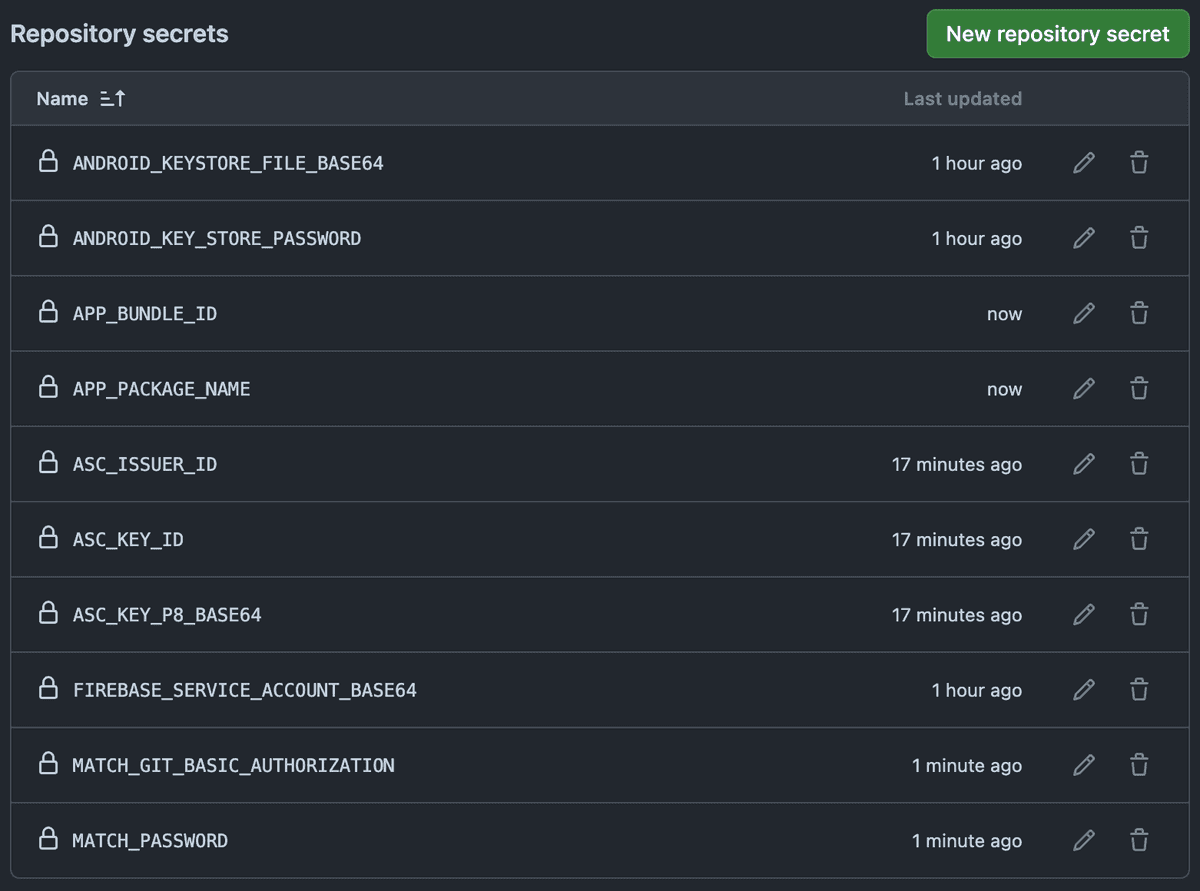
Your Github Secrets should look something like this:
The workflow file also supports Slack notifications. If you wish to receive notifications on Slack, you can add a webhook URL to the SLACK_LOGS_WEBHOOK secret.
The GitHub Actions workflow file
The following is the GitHub Actions workflow file that you can use to automate the deployment of your Flutter app:
name: Publish iOS and Android release

on:
  release:
    types: [published]

env:
  FLUTTER_CHANNEL: 'stable'
  RUBY_VERSION: '3.2.2'

jobs:
  build_ios:
    name: Build iOS
    # You can upgrade to more powerful machines if you need to
    # See https://docs.github.com/en/actions/using-github-hosted-runners/about-larger-runners/about-larger-runners#about-macos-larger-runners
    runs-on: macos-latest
    # Depending on how long your build takes, you might want to increase the timeou
    timeout-minutes: 20
    steps:
      - name: Checkout
        uses: actions/checkout@v4

      - name: Set up Ruby
        uses: ruby/setup-ruby@v1
        with:
          ruby-version: ${{ env.RUBY_VERSION }}
          bundler-cache: true
          working-directory: 'ios'

      - name: Run Flutter tasks
        uses: subosito/[email protected]
        with:
          # Remember to specify flutter version in pubspec.yaml under environment
          # https://github.com/subosito/flutter-action?tab=readme-ov-file#use-version-from-pubspecyaml
          flutter-version-file: 'pubspec.yaml'
          channel: ${{ env.FLUTTER_CHANNEL }}
          cache: true

      - uses: maierj/[email protected]
        with:
          lane: 'release_app_store'
          subdirectory: ios
          options: '{ "version_number": "${{ github.ref_name }}" }'
        env:
          ASC_KEY_ID: ${{ secrets.ASC_KEY_ID }}
          ASC_ISSUER_ID: ${{ secrets.ASC_ISSUER_ID }}
          ASC_KEY_P8_BASE64: ${{ secrets.ASC_KEY_P8_BASE64 }}
          MATCH_PASSWORD: ${{ secrets.MATCH_PASSWORD }}
          MATCH_GIT_BASIC_AUTHORIZATION: ${{ secrets.MATCH_GIT_BASIC_AUTHORIZATION }}
          APP_BUNDLE_ID: ${{ secrets.APP_BUNDLE_ID }}

  notify_ios:
    name: Send Slack Notification about iOS build
    needs: [build_ios]
    runs-on: ubuntu-latest
    timeout-minutes: 2
    steps:
      - name: Send Slack Notification about iOS build
        uses: rtCamp/action-slack-notify@v2
        if: ${{ !cancelled() && (success() || failure()) && env.SLACK_LOGS_WEBHOOK_PRESENT == 'true' }}
        env:
          SLACK_LOGS_WEBHOOK_PRESENT: ${{ secrets.SLACK_LOGS_WEBHOOK && 'true' || 'false' }}
          SLACK_WEBHOOK: ${{ secrets.SLACK_LOGS_WEBHOOK }}
          SLACK_CHANNEL: logs
          SLACK_USERNAME: '${{ github.repository_owner }}'
          SLACK_ICON: 'https://github.com/${{ github.repository_owner }}.png?size=250'
          SLACK_COLOR: "${{ contains(needs.*.result, 'success') && 'good' || 'danger' }}"
          SLACK_TITLE: "${{ contains(needs.*.result, 'success') && 'Successfully released' || 'Error during release of' }} ${{ github.ref_name }} for iOS to TestFlight"
          SLACK_FOOTER: 'DevOps'
          SLACK_MESSAGE: "${{ contains(needs.*.result, 'success') && 'Released:' || 'Release failed:' }} ${{github.event.head_commit.message}}"

  build_android:
    name: Build Android
    runs-on: ubuntu-latest
    timeout-minutes: 20
    steps:
      - name: Checkout
        uses: actions/checkout@v4

      - name: Set up Ruby
        uses: ruby/setup-ruby@v1
        with:
          ruby-version: ${{ env.RUBY_VERSION }}
          bundler-cache: true
          working-directory: 'android'

      - name: Run Flutter tasks
        uses: subosito/[email protected]
        with:
          flutter-version-file: 'pubspec.yaml'
          channel: ${{ env.FLUTTER_CHANNEL }}
          cache: true

      - name: Create google_service_account.json
        run: |
          echo "${{ secrets.FIREBASE_SERVICE_ACCOUNT_BASE64 }}" | base64 --decode > google_service_account.json

      - name: Create key.jks
        run: |
          echo "${{ secrets.ANDROID_KEYSTORE_FILE_BASE64 }}" | base64 --decode > android/key.jks

      - name: Create key.properties
        run: |
          cat <<EOF > android/key.properties
          storePassword=${{ secrets.ANDROID_KEY_STORE_PASSWORD }}
          keyPassword=${{ secrets.ANDROID_KEY_STORE_PASSWORD }}
          keyAlias=release
          storeFile=../key.jks
          EOF
        env:
          ANDROID_KEY_STORE_PASSWORD: ${{ secrets.ANDROID_KEY_STORE_PASSWORD }}

      - uses: maierj/[email protected]
        with:
          lane: 'release_play_store'
          subdirectory: android
          options: '{ "version_number": "${{ github.ref_name }}" }'
        env:
          APP_PACKAGE_NAME: ${{ secrets.APP_PACKAGE_NAME }}

  notify_android:
    name: Send Slack Notification about Android build
    needs: [build_android]
    runs-on: ubuntu-latest
    timeout-minutes: 2
    steps:
      - name: Send Slack Notification about Android build
        uses: rtCamp/action-slack-notify@v2
        if: ${{ !cancelled() && (success() || failure()) && env.SLACK_LOGS_WEBHOOK_PRESENT == 'true' }}
        env:
          SLACK_LOGS_WEBHOOK_PRESENT: ${{ secrets.SLACK_LOGS_WEBHOOK && 'true' || 'false' }}
          SLACK_WEBHOOK: ${{ secrets.SLACK_LOGS_WEBHOOK }}
          SLACK_CHANNEL: logs
          SLACK_USERNAME: '${{ github.repository_owner }}'
          SLACK_ICON: 'https://github.com/${{ github.repository_owner }}.png?size=250'
          SLACK_COLOR: "${{ contains(needs.*.result, 'success') && 'good' || 'danger' }}"
          SLACK_TITLE: "${{ contains(needs.*.result, 'success') && 'Successfully released' || 'Error during release of' }} ${{ github.ref_name }} for Android to Play Store"
          SLACK_FOOTER: 'DevOps'
          SLACK_MESSAGE: "${{ contains(needs.*.result, 'success') && 'Released:' || 'Release failed:' }} ${{github.event.head_commit.message}}"
Deploying locally
Now we have a pretty powerful setup for deploying our Flutter app to both the App Store and Play Store.
However, sometimes you wish to deploy locally. This can be handy if you wish to quickly process a release (your machine is likely faster than the GitHub Actions runner - and a lot cheaper).
Just remember to update the version in your pubspec.yaml file before running the following commands.
Deploying to Play Store
cd android && fastlane release_play_storeDeploying to App Store
cd ios && fastlane release_app_storeSummary
Congratulations! You now have a fully automated CI/CD pipeline for your Flutter app. Every time you create a new release on GitHub, your app will be built and deployed to the App Store and Play Store.
Additionally, you can swiftly build and deploy your app locally using Fastlane.
Please let me know in the comments section if you have any questions or if you run into any issues. I'll do my best to help you out!
Credits
- Thanks to Daniel Gomez for providing inspiration for reusing Fastlane logic and general lanes for flutter
- Thanks to Manoel Soares Neto for providing a detailed article about fastlane, match and the App Store Connect API keys

